Last updated: Feb 13, 2026
1. Welcome to Chromatose
Chromatose is a video synthesizer that lets you create, perform, and share original real-time visuals on iOS – no experience or laptop needed.
1.1 What is Video Synthesis?
Video synthesis is the real‑time creation of moving images with code instead of a camera. Think “painting with math” as algorithms draw patterns, colors, and motion that evolve while you play.
1.2 How is it like an audio synthesizer?
Audio synths start with oscillators and sculpt their sound with filters. Chromatose follows the same recipe for the eyes: it starts with “generators” (like visual oscillators) and shapes them with effects (visual filters). Same playground, just routed to pixels instead of speakers.
1.3 Real‑Time (No Timeline)
Chromatose does not behave like video editors you may already know. There is no timeline to scrub, no clips to load and nothing to pre‑render. Every frame is computed the instant it appears. Open a patch and visuals flow immediately. You cannot pause or rewind; images evolve in real time.
Chromatose feels more like improvising with a musical instrument. Your artwork is generative and born in the moment rather than arranged on a track. Because everything is produced on the fly, we call the video sources “generators”.
1.4 Key Concepts & Terminology
Chromatose uses many specific terms for various components, user-interface objects, computer graphics concepts, etc. Here are some of the basics.
- Patch - A savable, shareable document containing your entire creation.
- Generator - Produces the initial pixels that flow through the patch.
- Effect - Alters pixels by repositioning, recoloring, or distorting them.
- Mixer - Combines all generators and effects into the final video output image.
- Parameter - Any adjustable value in a generator, effect, or mixer.
- Modulation - Automation that changes a parameter over time or in response to audio.
- Macro Knob - A performance control that can adjust one or more parameters at once.
- Design View - The workspace for building and editing patches.
- Performance View - A streamlined view for live performance featuring eight macro knobs.
Refer to the glossary at the end for additional terms and detailed explanations.
2. QuickStart
2.1 Use a Preset
- If the Heads-Up Display is hidden, tap anywhere on the screen to show it.
- Tap the triple-dot button at the top to open the Main Menu.
- Open the Patch Library.
Here we see the factory-preset patches that ship with Chromatose. - Open the “Rainbow Trip” patch by tapping into its detail page, then tapping the thumbnail.
- From the main menu, make sure you’re in Performance View.
- Start moving any of the 8 pre-mapped macro knobs to get nice results right away.
- Next, activate audio-reactivity so the visuals dance to sound.
- From the main menu, open Settings, then Audio Engine.
- Make sure the audio engine is enabled by toggling it on.
- The meters show the raw audio signal coming in through your device’s microphone.
If the signal is weak boost it by increasing the gain. The “final” signal is what’s used for audio modulation; we want it to just barely reach the end of the level meter. - Exit Settings and go back to the patch.
- Play some music or make some noise and you’ll see it moving to audio.
2.1 Build a Patch from Scratch
Design View
- Open the Main Menu and make sure you’re in Design View.
- Tap “New” to start from the init patch.
- Delete Generator B (by tapping its first tab), and reset Generator A to the defaults (tap each knob then tap “Reset”).
- Open the color picker and choose anything except white.
Modulate
Let’s add some motion with modulation.
- Tap the “Y” axis parameter to open its popup.
- Go to the second tab for Modulation, adjust the Rate to make it move.
- Lower Depth to narrow the motion range (Depth may not be available for all wave types. If you don’t see it try changing the wave type - by tapping to cycle through them).
- Close the popup to return back to the Generator’s main controls.
- You’ll see an animated green dot showing the live modulated value, and a blue ring for Depth.
- Add back in Generator B so we can mix the two together.
Notice how it appears above A. Generators stack from A (at the bottom) to D (at the top). - On the mixer, cycle the thru the Composite and Blend modes until Generator B masks out Generator A but keeps the original color.
Add Effects
Get trippy with some effects.
- In the Mixer, tap the
+tab and add a Feedback effect. - Adjust it to your liking, then add another Edge effect.
(Effects get chained in serial one after another) - Add as many effects as you like to the Mixer or any Generator.
- Every effect has a Dry/Wet knob to mix the effected signal with the original signal. (You can turn it all the way down to bypass the effect completely, or tap the effect’s tab to replace or delete it.)
Save
- When finished, tap “Save” in the Main Menu to store your Patch.
3. Setup
Chromatose is available for free on the App Store and is supported on iOS and iPadOS 18+. All features can be evaluated without a subscription.
Device Permissions
- Microphone – Required only when the Audio Engine is enabled. Audio volume is analyzed for modulation, it’s never recorded. Manage under Settings ▸ Privacy ▸ Microphone
- Photos – Needed to load images into generators or to save screenshots. Manage under Settings ▸ Privacy & Security ▸ Photos.
4. User Interface Basics
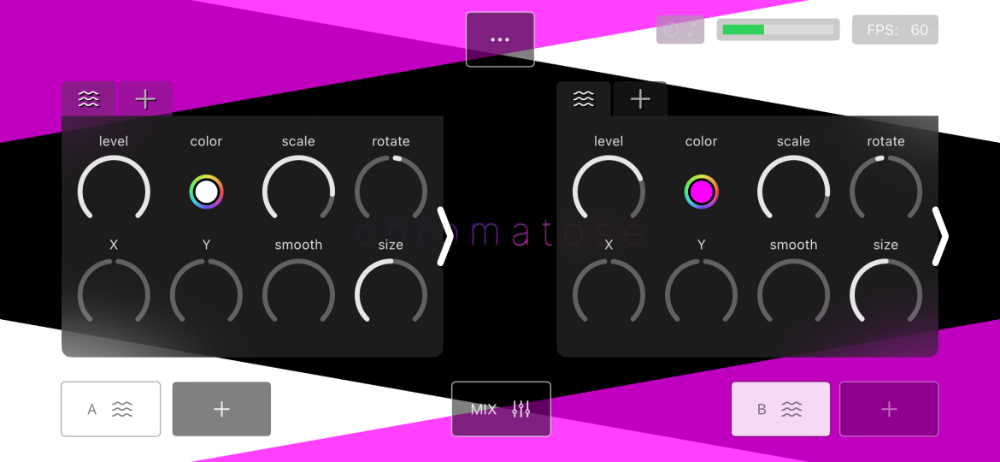
Chromatose renders its final output as a background. All controls live in the heads-up-display (HUD) which is layered over the background. Tap the background to show or hide the HUD.
4.1 Main Menu
The button with three dots at the top center opens the main menu:

- Perform / Design - Switches between the Design View and Performance View.
- Settings - Opens app-wide settings.
- Screenshot - Saves a single frame to your photo library.
- Record - Starts capturing video of the output.
- Library - Opens the patch library.
- Save - Saves your current patch.
If you’ve opened a previously saved patch you’ll also have the option to “Replace” it. - New - Loads the init patch (unsaved changes are lost).
Tap outside the menu to close it.
4.2 Status Section
A small section in the top‑right shows the following status indicators:
- MIDI activity (CC & Clock) - visible when MIDI is enabled
- Audio Input Level (of the main audio input) - visible when Audio Engine is enabled
- Video Recording / Stop Button - visible when a video recording is in progress - when tapped ends the recording
- FPS (Frames Per Second) - the current frame rate
- External Display - external screen connection status
4.3 Control Panels
Control panels are like mini windows containing a collection of parameter controls.
Control Panel Buttons
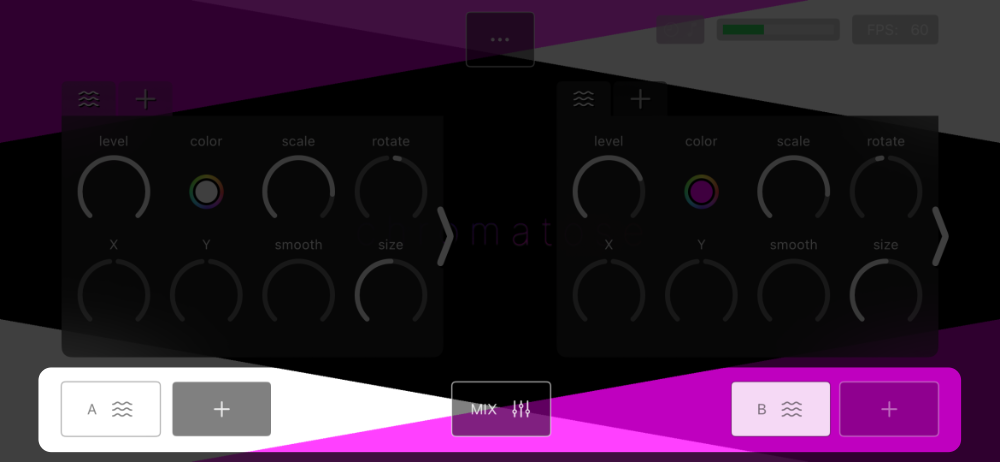
Five control‑panel buttons sit at the bottom of the HUD — one per generator plus one for the mixer. Tap to expand or collapse.
A + icon means the slot is empty; tap to add a generator (slots fill from left to right).
Paging
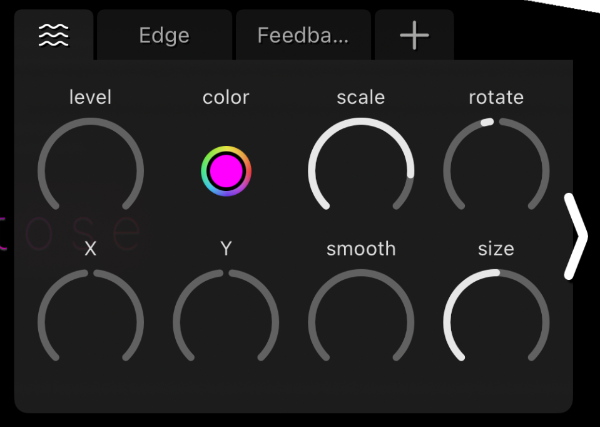
Each control panel shows up to eight controls; use the arrows to page through larger sets.
Tabs
Scrollable tabs along the top of a panel represent the generator or mixer followed by its effects.
- Tap the first tab for options to: replace, delete, or move it.
- Tap the
+tab to add an effect. - Tap an existing effect tab for options to also: replace, delete, or move it.
Note: Unlike generators and effects, the mixer cannot be deleted or moved.
4.4 Parameter Controls
Control panels may contain different types of parameter controls:
- Color Picker - Opens a color picker for color selection.
- Multi-Select - Cycles through preset values.
- Numeric Knob - Sets numeric decimal values. Tap a knob for advanced options (see: 5.4 ).
Note: Some parameters function only when related options are active.
5. Design View
Design View is where you start from a blank canvas or dive deep to customize every detail of your patch.
5.1 Generators
Generators are the first building blocks of every patch. They create the initial pixel data that later flows through effects. They might draw patterns, run simulations, display photos, or anything that fills the frame. Each comes with a rich set of parameters for motion, size, color and complexity.
5.2 Effects
Effects process the pixel stream produced by generators. Think of them as super‑powered photo filters, each packed with parameters for recoloring, warping, and distorting the image. Some even bend time by feeding frames back into themselves, creating echo‑like motion trails.
Effects run in series. Pixel data leaves a generator and flows through Effect 1, then Effect 2, Effect 3, and so on. Stack as many as your device can handle — the deeper the chain, the richer the texture, revealing visuals you could never get from a single step.
5.3 Mixer
The Mixer composites all active generator chains, then runs its own effects. Mixer stacks these sources like layers in a photo‑editing app, so layer order matters. Processing flows as shown:
Generator A  → [A Effects]
                  ↓
Generator B  → [B Effects]
                  ↓
Generator C  → [C Effects]
                  ↓
Generator D  → [D Effects]
                  ↓
               Composited Blend
                  ↓
               [Mixer Effects]
                  ↓
               Final Output
Generators are combined according to the composite mode and blend mode you pick. Experimenting with different combinations unlocks textures you can’t achieve any other way. For details, see: Compositing and Blending
Composite modes (transparency‑based visibility): Over, Atop, Inside, Outside, XOR.
Blend modes (color‑mix algorithms): Normal, Add, Subtract, Multiply, Difference.
The mixer also exposes a BPM control which sets the global tempo for all time‑based modulations in the patch.
5.4 Parameters
Each generator, effect, and the mixer are composed of various parameters.
Tap a numeric parameter knob to open its popup revealing additional mapping and modulation features.
Parameters can be modulated by time or audio or both. If both, they get interpolated together.
5.4.1 Parameter Detail
The first tab of the parameter popup, gives you additional control over setting its value.
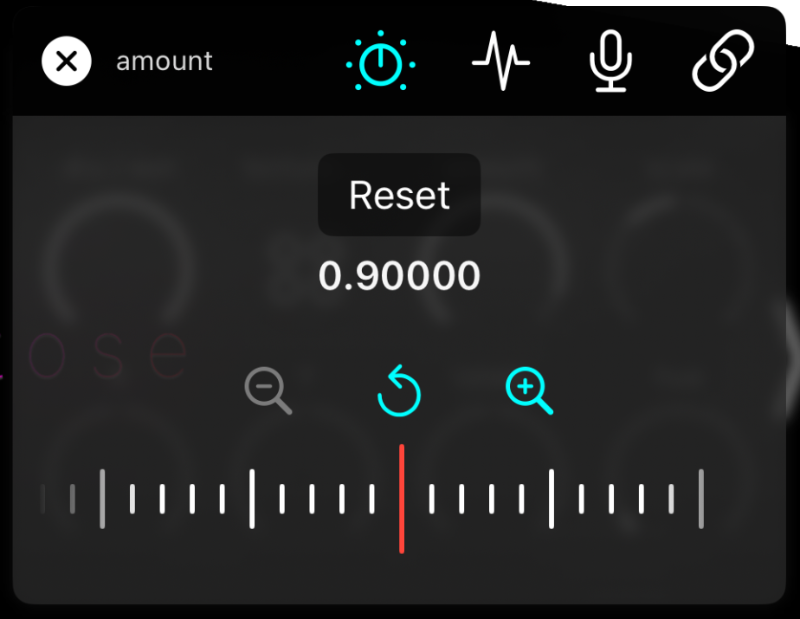
Reset
Restores a parameter to its default value and clears all modulation.
Fine-Tuned Entry
Use the horizontal slider for extra precision.
- The right magnify button (
+icon) zooms in for finer resolution adjustments. - The left magnify button (
-icon) zooms back out. - The center undo button reverts any fine-tuned changes.
5.4.2 Time-Based Modulation
The second tab of the parameter popup, lets you automate changes to a parameter over time. If you’ve used low‑frequency oscillators (LFOs) in a synth or DAW, the idea is similar — only here every knob has its own builtin LFO, so there’s nothing extra to create or map.
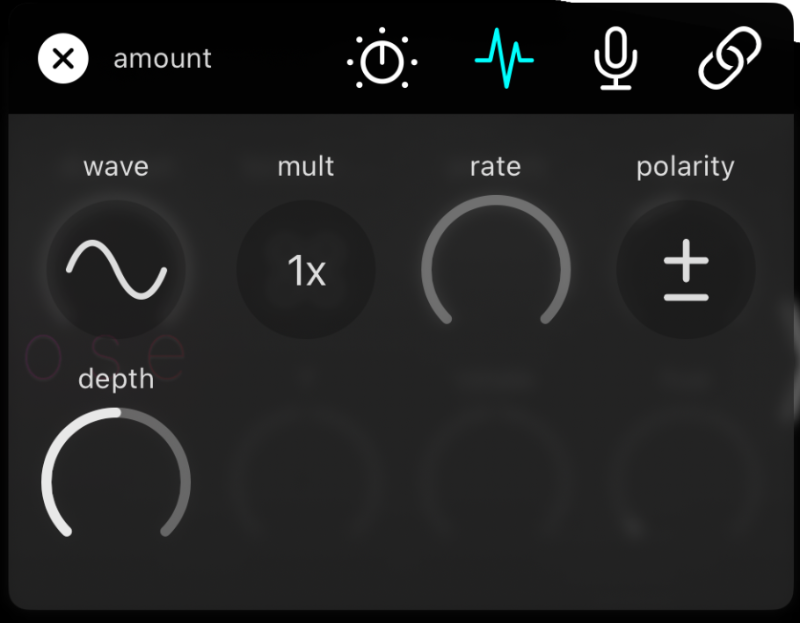
Rate
Activates modulation and sets the speed. Setting to zero disables modulation.
Multiplier
Scales the rate up or down.
Wave
Shapes the motion. You can select from various waveshapes such as:
- Infinite Drift (only supported by some parameters) - Keeps the value climbing or diving without limit.
- Sine
- Square
- Saw Up
- Saw Down
- Random
- Smooth Random
Depth
Sets the range (upper and lower bounds) of the modulation.
Polarity
Controls the modulation direction.
- Positive – Moves only higher.
- Negative – Moves only lower.
- Bipolar – Moves both above and below the starting point.
Parameters with active time-based modulations display the depth as a blue ring around their knob.
Tip: The rate and depth knobs can themselves be modulated. Nesting modulation this way unleashes wild, complex animations.
Tip: You can globally speed up or slow down every modulation with the BPM knob in the main mixer control panel.
5.4.3 Audio-Based Modulation (Audio Reactivity)
Want your visuals to dance to a beat?
The third tab of the parameter popup, provides controls to make any parameter react to audio in real-time.
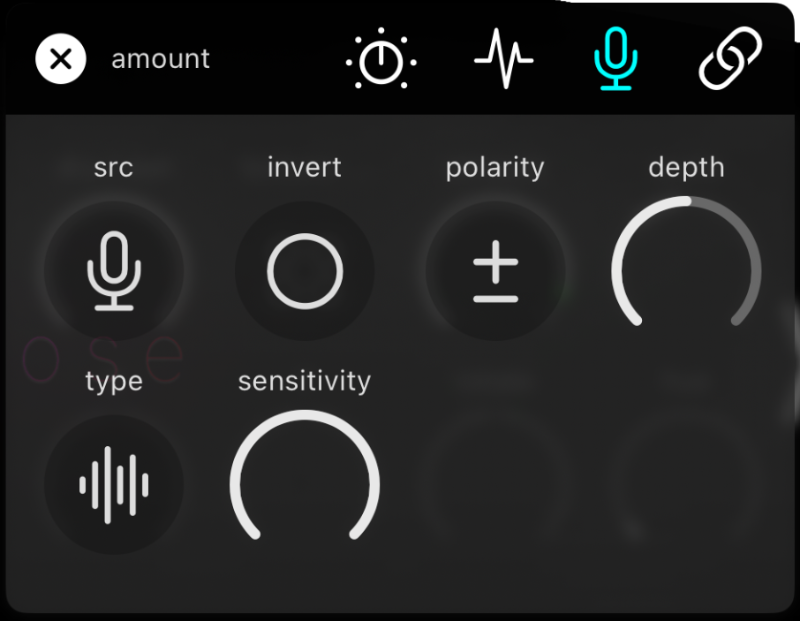
Note: Enable in Settings ▸ Audio Engine first.
Source
- Off – Disable audio modulation.
- Main – Full‑band audio signal.
- Low‑Pass – Filtered bass‑only signal.
- High‑Pass – Filtered treble‑only signal.
Invert
Flips the signal if needed. High values become low and low values become high.
Polarity
Controls the modulation direction (same as time‑based modulation).
- Positive – Moves only higher.
- Negative – Moves only lower.
- Bipolar – Moves both above and below the starting point.
Depth
Sets the range (upper and lower bounds) of the modulation (same as time-base modulation).
Type
- Follow – Continuously tracks the live signal.
Turn Sensitivity up or down to control how tightly it follows. - Envelope – Triggers only when the signal crosses the threshold (configured in settings).
attack sets rise time, decay sets fall time.
Parameters with active audio-based modulations display the depth as an orange ring around their knob.
5.4.4 Macro Mapping
The last tab of the parameter popup, lets you map the parameter to any of the 8 macro knobs in the Performance View.
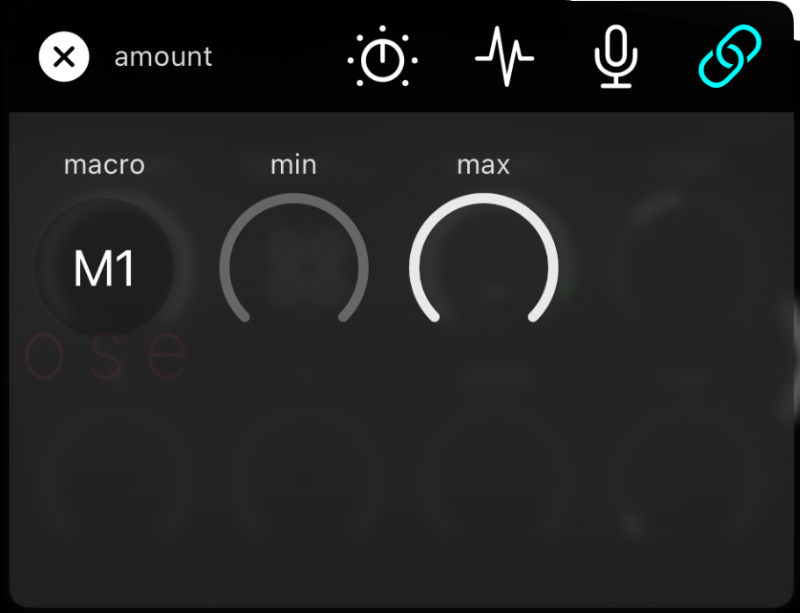
You can map multiple parameters to the same macro knob.
Set Min and Max to limit its range.
Tip: Turn Min all the way up and Max all the way down to invert the knob.
6. Performance View
Performance View is optimized for live performance. Eight Macro Knobs sit front and centre and can be MIDI‑mapped (see: MIDI Mapping ).
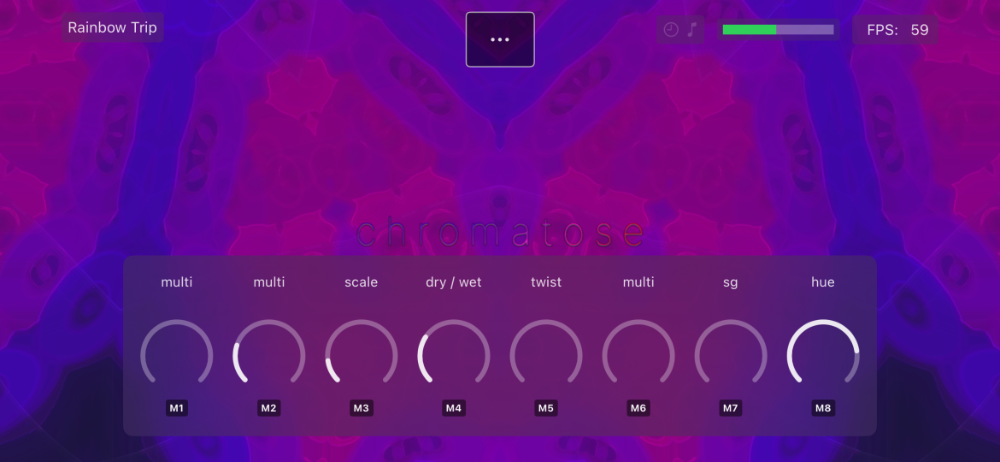
In order to use a macro knob you must first map at least one parameter to it from the Design View (see: Macro Mapping ).
Long-press a label and choose Reset to unmap all parameters from a knob.
Note: Macro knobs are for manual control only; they cannot themselves be modulated or mapped.
7. Patch Library
Manage all your saved patches in the Patch Library.
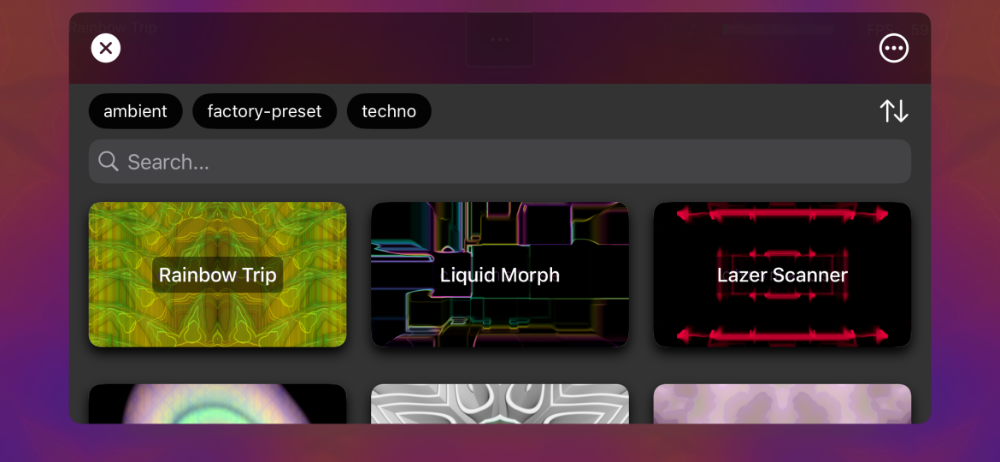
Patch List View
This is your library’s home screen. Here you can do the following:
- Browse — Scroll through all saved patches.
- Search — Tap the search bar to filter by name.
- Sort — Sort by name, date created, or date modified.
- Tag Filter — Tap one or more tags to filter the list. Tap again to clear.
- Import — Tap the menu (top‑right) to import a
.chromatosefile from Files, AirDrop, or another app. - View Detail - Tap any patch in the list to open its detail view.
Patch Detail View
- Load — Tap the thumbnail.
- Rename — Edit the name field.
- Edit Tags — Add, remove, or edit tags to improve search and organization.
- Share — Export the patch as a
.chromatosefile and share via AirDrop, Messages, or another app. - Delete — Permanently remove the patch from your library (this cannot be undone).
- Metadata - At the bottom you can view device and settings info used to create the patch.
8. Exporting Content
Don’t forget to use the #MadeWithChromatose hashtag on social media. We may feature your post.
8.1 Patch Sharing
Share a patch file with other Chromatose users:
- Open the Main Menu (top‑center).
- Tap Library.
- Select the patch you want to share.
- Tap the Share button (top‑right) and choose the destination: AirDrop, Files, etc.
8.2 Screenshots
Capture a still frame of your current patch:
- Open the Main Menu (top‑center).
- Tap Screenshot.
The image is saved to Photos.
8.3 Video Recording
Record your visuals as a video clip:
- Open the Main Menu (top‑center).
- Tap Record.
A red pulsing icon appears in the HUD (top‑right) while recording. - Tap the red icon to stop, or wait until the time limit expires (limit varies by license). You’ll be presented with options to save or share the video file.
Note: Video is recorded at the same resolution as the rendered output, which is usually the same as your iOS device’s screen resolution.
Important: While recording, some features may be temporarily unavailable to maintain smooth capture.
Videos are encoded with the following settings.
8-Bit SDR Render Mode
- Container: Mov
- Codec: HEVC
- Color Bit-Depth: 8-bit
- Colorspace: Rec.709
- Video bitrate: VBR, 25 Mbps maximum
- Chroma Subsampling: 4:2:0
16-Bit SDR Render Mode
- Container: Mov
- Codec: HEVC
- Color Bit-Depth: 10-bit
- Colorspace: Rec.2020
- Transfer Function: Rec.709
- Video bitrate: VBR, 25 Mbps maximum
- Chroma Subsampling: 4:2:0
16-Bit HDR Render Mode
- Container: Mov
- Codec: HEVC
- Encoding Profile: Main10
- Color Bit-Depth: 10-bit
- Colorspace: Rec.2020
- Transfer Function: HLG
- Video bitrate: VBR, 25 Mbps maximum
- Chroma Subsampling: 4:2:0
9. Connecting Peripherals
We test as much hardware as possible, but compatibility isn’t guaranteed. If you run into trouble, join our Discord for help.
9.1 External Displays
It’s possible to connect your iOS device to an external HDMI capable display/screen such as a TV, computer monitor, or projector, etc.
Chromatose automatically recognizes when an external display is connected and will enter external display mode, indicated by the display icon in the Status Section. In this mode, only the final rendered output is shown on the external display, and only the HUD controls are shown on the iOS device.
The resolution your iOS device is capable of delivering is highly dependent on your hardware. Older or less powerful devices may experience frame drops with high resolution external displays.
For external display related settings see: Settings ▸ Graphics Engine .
Always use high-quality HDMI cables and adapters that support 4K resolution and 60Hz refresh rate. Read the fine print - some cheaper cables/adapters claim to support certain resolutions but only upscale lower resolutions resulting in distorted images.
Some external display resolutions may be restricted by the license you have purchased. You can always evaluate any resolution, but a watermark is displayed if your license restricts access to the selected resolution. For details see: Settings ▸ Account .
9.1.2 USB-C to HDMI (Recommended)
iOS Devices with a USB-C port have these options:
- USB-C to HDMI adapter (Recommended)
To ensure your device can be charged while connected, ensure the adapter also offers USB-C PD charging. We’ve had success with the “UGREEN Revodok 206” adapter. - USB-C to HDMI cable without an adapter
With this method it’s not possible to charge your device with a wired charger. Wireless charging may be possible depending on your device.
Maximum supported resolution is 2160p for iOS devices with a USB-C port.
9.1.3 Lightning Port to HDMI
Older devices with a “Lightning” Port must use an HDMI adapter. Official adapters from Apple are the safest choice.
Some cheap lightning adapters have been discovered to not support the resolution they claim.
Maximum supported resolution is 1080p for iOS devices with a lightning port.
9.1.1 AirPlay
All devices should support Apple AirPlay for connecting to AppleTVs or smart TVs. When using AirPlay the resolution is limited to 1080p and the video is compressed resulting in a slightly distorted image. For best results we recommend using one of the wired options above.
For AirPlay instructions see: Mirror your iPhone or iPad to a TV or Mac .
9.2 MIDI
Chromatose receives MIDI CC or Clock messages from any connected devices on all channels.
MIDI CC messages can be used to control Macro Knobs. MIDI Clock can be used to sync the global tempo of the patch from a MIDI controller.
Chromatose only receives MIDI and does not output any MIDI.
9.2.1 MIDI Connection
To connect any MIDI device, make sure MIDI is enabled in the Chromatose MIDI Settings. Any of the following MIDI connection methods are supported.
MIDI over Bluetooth
- Ensure Bluetooth is enabled in your device settings.
- Do NOT try to pair the device in your device’s Bluetooth settings, instead go directly to: Chromatose ▸ Settings ▸ MIDI ▸ and press the ‘Connect’ button.
- An iOS system dialog is presented to connect your MIDI device.
- Once connected you should see it in the list of connected MIDI devices with a green checkmark, if not try tapping the ‘Refresh Devices’ button or repeat the previous step.
MIDI over USB
- Simply plug the MIDI output of your MIDI controller into the input of your iOS device (you may need to use an adapter).
MIDI over WiFi
- If using MacOS, follow the instructions provided by Apple
9.2.2 MIDI Mapping
You can use “MIDI Learn” to map your MIDI controller’s knobs/sliders/etc to any of the 8 Macro Knobs.
After connecting your MIDI Controller:
- Go to Chromatose ▸ Settings ▸ MIDI.
- Scroll down to the MIDI Mapping section.
- Tap one of the 8 Macro Knobs you want to map. It should have a pulsing blue circle around it to indicate it’s listening.
- Move one of your controller’s controls.
- When the mapping is successful the Macro Knob setting displays the MIDI CC number it is mapped to.
9.2.1 MIDI Clock Sync
- Go to Chromatose ▸ Settings ▸ MIDI.
- Enable MIDI Sync
- Exit Settings.
- You should now see a clock icon in the top right Status Section.
- Verify that when you send a MIDI Clock signal the icon lights up.
9.3 Audio Interfaces
Chromatose’s audio reactivity has been thoroughly tested and works very well in a variety of environments using just the iOS device microphone.
Chromatose can also listen to channel 1 of any class‑compliant audio interface. This feature is experimental — let us know in Discord if you experience issues.
10. Settings
10.1 Account
Here you can manage your subscription and other account related settings.
10.2 General
Here you can manage general settings related to the user interface etc.
10.3 Graphics Engine
These settings have to do with the core grahpics engine in Chromatose and determine how rendering is performed.
Pixel Format
Configures the color depth. Higher values provide a wider range of colors, but may impact performance. You can reduce this value if you experience performance issues or frame drops.
Target FPS (Frames per Second)
60 FPS is recommended for most cases. Lower values reduce resource consumption. Higher values produce smoother motion. Not all devices/screens support higher FPS. Ensure your device is not in low-power mode, or limiting frame rates under: System Settings ▸ Accessibility ▸ Motion.
External Screen Settings
These settings only appear when you connect an external screen like a TV, Computer Monitor, or Projector.
Here you can select the desired resolution for your external display.
10.4 Audio Engine
The audio engine samples incoming audio and performs amplitude (volume) analysis in order to drive audio-based modulation (audio reactivity).
Unfortunately due to iOS restrictions, it is not possible playback audio from other apps on the same device while the Audio Engine is enabled.
Enable Audio Engine
Here you can fully enable or disable the audio engine.
Level Analysis Method
You can choose from two analysis methods to determine audio modulation values:
- Peak - Uses the peak volume levels for modulation
- RMS (Root-Mean-Square) - Averages the volume levels over a short time-frame for smoother values.
Signal Settings
Chromatose splits incoming audio into 3 different signals for use in audio modulations.
- Main: This is the raw unfiltered audio exactly as it comes through the input.
- Low Frequency: This is the main signal, run through a Low-Pass Filter (LPF) which removes higher frequencies.
This is useful for isolating lower frequency content like basslines or kick drums. - High Frequency: This is the main signal, run through a HPF (High-Pass Filter) which removes lower frequencies.
This is useful for isolating higher frequency content like snare drums or hi-hats.
Each of these signals has its own settings for:
- gain - boosts the incoming audio signal. Useful if the source signal is too quiet.
If set to zero, this has no effect. - threshold - a minimum value the signal must reach in order to be used. Values below this are ignored.
This is useful to remove background noise from noisy environments.
If set to zero, this has no effect.
NOTE: Audio signals must start below the threshold and pass through it in order to trigger envelope style audio-modulation. For details, see: audio-modulation .
Low Frequency and High Frequency signals also have dedicated cutoff knobs which set their respective filter frequencies.
Level Monitoring
Each of the three audio signals displays its own set of level meters. The first two meters are just for reference.
Only the last meter, labeled final (gated) is used to drive audio modulations.
10.5 MIDI
- Enable or disable MIDI
- Connect your MIDI Bluetooth device
- Enable MIDI Sync
- Map your MIDI Controller to Macro Knobs
For more details, see: MIDI .
10.6 Privacy & Legal
Here you can read our privacy policy, and enable or disable any data sharing options.
11. Troubleshooting
Bluetooth MIDI connection issues?
Try disabling and re-enabling Bluetooth in the device settings.
External display not connecting?
Sometimes displays are not immediately recognized. If so, it can be helpful to:
- exit Chromatose and first try to get the display working with just the iOS device
- unplug and replug the HDMI connection to your iOS device.
- Turn the display off and on again.
- Try various display mode settings for your iOS device under System Settings ▸ Display and Brightness.
The Feedback Effect is not working
Usually this is because the content coming into the feedback effect has no alpha (transparency) left in it. Feedback can only work when there are some transparent pixels. Try reducing some of the effects before the feedback effect, or use something like an Edge or Keying Effect to filter out some of the pixel content.
Framerate (FPS) is Dropping
If you’re running a heavy patch it’s possible to experience dropped frames. Chromatose currently doesn’t prevent you from maxing out patches beyond your hardware’s capacity, so this can happen if there’s too much for your hardware to process. Most newer hardware should be able to run all 4 generators and dozens of effects without issues. However if you see the FPS drop, here are some steps you can take to get things running more smoothly:
- Reduce the size of the photos before loading them into Chromatose (using a photo editor).
- Reduce the output render resolution (Graphics Engine settings).
- Reduce the color bit-depth from 16-bit to 8-bit (Graphics Engine settings).
- Reduce the target framerate (Graphics Engine settings).
- Disable Audio Engine.
- Disable or remove some Generators or Effects.
Generators that may be especially computationally expensive: Noise (cloud type), Photo (with large photos), Growth
Effects that may be especially computationally expensive: Feedback, Ripple
Achieve Smoother MIDI CC Control
MIDI smoothness depends on the type of the controller. Most older MIDI controllers only support 7-bit CC values (0-127 steps of CC resolution). Some newer controllers may support NRPN which offers 14-bit values (0-16383 steps of CC resolution) and can produce a very smooth experience. So if you see visually jerkiness while moving your controller you may want to try switching to a controller with NRPN - this should be noted in the user manual or technical specifications of your specific device.
Appendix
Glossary
1080p - Often called HD, is a video resolution with a vertical resolution of 1080 pixels and a horizontal resolution of 1920 pixels. Also written as: 1920 x 1080.
2160p - Often called Ultra HD or 4K, is a video resolution with a vertical resolution of 2160 pixels and a horizontal resolution of 3840 pixels. Also written as: 3840 x 2160.
4K - see 2160p
Alpha Channel - The transparency information in an image or video. Each pixel’s alpha value defines how visible or transparent it is.
Audio-Reactivity - A feature that makes visuals respond dynamically to incoming audio signals, creating movement or effects based on sound.
Audio-Modulation - The process of using audio input (volume or frequency content) to automatically change parameter values over time.
Blend Mode - A rule that defines how overlapping pixels are color-mixed. Examples include Add, Multiply, and Difference.
Composite Mode - A rule for deciding which parts of overlapping layers are visible, based on transparency. Examples include Over, Atop, and XOR.
Effect - A visual processor that modifies pixel data, such as warping, recoloring, or distorting the generator output.
Feedback - A visual effect where previous frames are reused in the current frame, often creating echo-like trails or motion smears.
FPS - Frames Per Second. The number of video frames rendered or displayed each second.
Frame - A single still image in a video. Each second of video is made up of many frames.
Generator - A module that creates initial visuals such as shapes, patterns, or photos. The starting point of a visual chain.
HDMI - High-Definition Multimedia Interface. A common standard for transmitting high-resolution video and audio between devices.
HUD - Heads-Up Display. The user-interface overlay shown on top of the visuals, used to control the app.
Init Patch - The default patch loaded when creating a new project. It’s a clean starting point.
Mixer - The final composited output of all generators and effects. The last stage before visuals are displayed or recorded.
Modulation - The automatic adjustment of parameters over time or in response to audio input. Can be time-based or audio-based.
MIDI - Musical Instrument Digital Interface. A standard for communication between electronic instruments and devices.
MIDI CC - MIDI Control Change. A type of MIDI message used to send controller values like knob or slider positions.
MIDI Channel - One of 16 available channels in MIDI, allowing multiple instruments to communicate independently.
MIDI Clock - A MIDI signal that sends timing information to synchronize tempo between devices.
MIDI Note - A message representing a musical note (pitch and velocity), often used for triggering or syncing actions.
Parameter - A controllable value within a generator, effect, or mix that shapes how it behaves.
Patch - A term borrowed from modular synthesis, here it’s a document containing everything you’ve done to design your artwork.
Phase - The position within a repeating waveform cycle, used in modulation or oscillation.
Pixel Format - Defines the data structure and color depth of each pixel (e.g. 8-bit or 16-bit color).
Resolution - The dimensions of a video output measured in pixels (width x height). Higher resolutions offer more detail.
RMS - Root Mean Square. A way to measure the average energy of an audio signal, useful for smooth and steady modulation.
UI - User Interface. The collection of controls and visual elements used to interact with the app.
USB-C - A reversible connector used for video, data, and power. Common on modern iOS devices and accessories.
Waveshape - The form of a repeating signal used in modulation, such as sine, square, or random.
Advanced Topics
Compositing and Blending
Composite Mode
Compositing uses alpha to decide which pixels are visible when layers overlap (alpha
is just a fancy graphics term for the transparent portion of an image/video).
Composite modes determine which parts of the source and destination layers remain visible by comparing their alpha coverage before any color math is applied. They originate from Porter–Duff operators .
Chromatose supports the following composite-modes:
- Over – Places the current layer over what’s beneath wherever its pixels have opacity.
- Atop – Shows the current layer only where lower layers already have content; outside that area the lower layers remain visible.
- Inside – Keeps only the portion of the current layer that overlaps the opaque area of lower layers.
- Outside – Keeps only the portion of the current layer that falls outside the opaque area of lower layers.
- XOR – Displays pixels where either the current layer or the layers below are opaque, but not where both overlap, creating a cut‑out look.
Blend Mode
Blend modes mathematically mix the color channels of overlapping pixels.
Chromatose supports the following blend-modes:
- Normal – Replaces the underlying pixels with the current layer.
- Add – Adds color channels, brightening the result like stacked light.
- Subtract – Subtracts the current layer’s channels, darkening or inverting areas.
- Multiply – Multiplies channels, darkening and mixing colors like overlapping gels.
- Difference – Shows the absolute difference between layers, yielding high‑contrast, psychedelic results.
For excellent interactive visual examples checkout the docs for the Coloraide project .
